 A
A  Episode
Guide
Episode
GuideEpisode 51: The Mystery Duelist - Part II (The Broken Millennium Puzzle)
Yugi is determined to find a way to win the duel with MindSlave Bandit Keith, but he wishes he didn't have to do it alone! He could sure use his friends.
Keith tells him to make his move, and he draws the Koumori Dragon (Devil Dragon), a weak monster that can't challenge Zera. He plays it in defense. The man controlling Keith thinks that Yugi's deck is weak, and he'll have no trouble beating him. (In the Japanese, he's thinking that he'll use magic and trap cards to push Yugi to the brink, and then the person in the Millennium Puzzle will show himself.) Keith plays Seiyaryu (Glory Night Dragon, I think Keith's saying. Something Night Dragon, anyway.), a monster with 2500 attack points, in attack mode. Then, pulling another card from his sleeve, he plays a magic/trap card face down, then plays the magic card Stop Defense to force Yugi's Koumori Dragon into attack mode. He uses Zera to destroy the Koumori Dragon, reducing Yugi's life points to 400, and telling Yugi that the end is near. "And soon I will be the keeper of that Millennium Puzzle!" the mind controller gloats. ("Come on! Come out!" he says in the Japanese. "If you are who I think you are...")
Yugi looks down at his Puzzle, bolted to the side of the dueling platform, and vows never to let that freak get his hands on it! (In the Japanese, he says, "Don't come out!" to the spirit. "I'll think of something.") This duel's not over, he says, and draws his next card. He plays another monster in defense, and Keith attacks it with Seiyaryu, destroying the Mystical Elf. Then Keith places two more cards in his magic/trap zone, and switches Zera to defense mode, telling Yugi his move will become clear soon. (In the Japanese, he tells Yugi he has no cards on the field. "What will you do, Yugi?" he asks, and ends his turn.)
Yugi draws, thinking this is more like it! He plays a magic/trap card face down, and Dark Magician in defense mode, with Magical Hats to hide him. But Keith plays his trap card, Magic Jammer, allowing him to negate Magical Hats by discarding a card from his hand. The Dark Magician is exposed! Then Keith turns over another card, the magic card Curse of Fiend (Demon's Ritual), which switches all monsters on the field from attack to defense, or vice versa. Since he'd switched Zera to defense, it now goes into attack mode, and Yugi's Dark Magician is forced into attack mode as well. Then Zera attacks Dark Magician.
Yugi plays his trap card, Mirror Force, to block Zera's attack. But Keith counters with his own trap card, Solemn Judgment (Declaration of God), to destroy Mirror Force and negate its effect. He pays half of his life points to use it, but Zera is saved and the Dark Magician is destroyed—and Yugi has only 100 life points left!
Outside the warehouse, Dark Bakura stands. He knows the Millennium Puzzle is inside, but he also senses dark forces from the Shadow Realm. (In the Japanese, he doesn't say or think anything. He just stands there.) Entering, he sees the dueling arena, and realizes that Yugi's dueling for possession of the Millennium Puzzle.
Yugi draws, and plays a magic card face down, and a monster in defense mode, saying, All right, let's see what you've got! MindSlave Keith says it's time to end this duel, and claim the power that is mine! Keith pulls another card from his sleeve (he's not even being particularly secretive about it) and plays Tribute to the Doomed (Offering for the Dead), a magic card that allows him to destroy any monster on the field by discarding a card from his hand. That's one of the rarest cards there is! Yugi exclaims. But Yugi's ready for it with his trap card, the Living Arrow, which takes Keith's magic and sends it back at him. Zera is destroyed.
Dark Bakura realizes that the Shadow forces he's detected are coming from Keith, who's just a puppet in the control of another. This puppet show is over, he says, for only he will possess the Millennium Puzzle! He uses the power of the Millennium Ring to break the link between Keith and his controller. (In the Japanese, all he says is that Keith is being controlled and he's using the Millennium Ring to break the control. Doesn't say why.)
Keith's controller is astonished that his control has been broken. Only another Millennium Item can sever the link! (It's the Dark Power, he says in the Japanese.) Keith comes back to himself, wondering what's going on and why is he wearing this robe?! Yugi tells him now that Zera is gone, it's time for him to win this duel and take back his Millennium Puzzle. (In the Japanese, he tells Keith that he's underestimating his opponent, depending too much on rare cards. "You can't stop my attacks!") Keith, however, doesn't know what Yugi's talking about. Keith struggles as the mystery man attempts to regain control over him. (In the Japanese, Yugi wonders if this was what the spirit of the Puzzle was talking about, and remembers his other self telling him that he sensed someone watching him. Meanwhile, the controller is telling Keith he must find out who's hiding in the Millennium Puzzle.) The man takes control briefly, and Keith rushes over to the Puzzle, saying that if he can't have it, no one can! (In the Japanese, it's still Keith, thinking it's the Puzzle trying to control him.) He smashes the Puzzle against the wall, scattering it into its pieces. Yugi cries out in horror. Still struggling against the control, Keith thrashes around. Suddenly, Bakura swings down out of the rafters on a rope, knocking Keith over. Keith falls off the dueling ring.
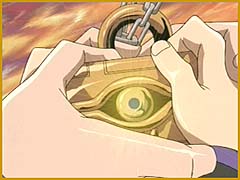
Yugi jumps down from the dueling platform, asking Bakura what he's doing there. Bakura says Téa told him what happened, and picks up the pieces of the Millennium Puzzle, saying at least it wasn't stolen. (In the Japanese, Bakura tells Yugi it's his responsibility to put the Puzzle back together. "It's what he wants, anyway," he says.) Yugi sadly takes the pieces in his hands, hoping he can put it together again. It took him forever the first time, but since he's done it once already, he hopes this time will be easier. (It took Yugi eight years the first time, he says in the Japanese, and he'll do it again if it takes him ten years!)
Unknown to him, Dark Bakura has kept back one piece of the Puzzle, which he infuses with magic, thinking this will prevent anyone from getting in his way again. In his mind, he calls Yugi a naive fool, thinking Yugi has no idea of the magical powers the Millennium Items possess. (In the Japanese, he says he admires this about Yugi and his other self.) His Millennium Ring will help him to track down these Items one by one and take their power. (He doesn't say this in the Japanese. Instead, he recounts that when all seven of the Millennium Items are assembled, the seal will be broken and the Pharaoh's memory is called back.) Long ago in the age of the Shadow Games, the ancient Pharaoh and his followers sealed away the power in the Items, thinking it would be safe forever, but the time has come for Dark Bakura to claim them all! (In the Japanese, he says that the Pharaoh and six priets sacrificed themselves to seal the evil power away, and he wants to see a return of that power.) He uses his Ring to transfer a portion of his spirit into the Puzzle, so that he will be able to explore the chambers of the Puzzle and one day claim it for himself. (In the Japanese, he thinks he'll find the sacred memory inside the labyrinth.)
Bakura gives the missing piece back to Yugi, then climbs down from the dueling ring, falling on his butt and generally acting like a doofus, and heads back to school. Yugi says he'll be along as soon as he unhooks his chain, which is still bolted to the wall with the top part of the Puzzle.
Meanwhile, Keith regains consciousness, with the mind controller still shrieking at him to get up and finish the duel. Crazed, Keith picks up a pipe and starts waving it around, threatening the presence he thinks he sees. Yugi calls out to him to stop, but Keith continues to fight the air, eventually hitting the controls of some machinery, causing sparks to fly and live wires to split, showering sparks on cans of gasoline.
Joey, Tristan, and Téa, still searching for Yugi, see a plume of smoke rising from a building a few blocks away. Keith's rampage has started a fire inside the warehouse. Desperately, Yugi pulls on the chain, trying to get his Puzzle free so he can get out, but it's too strong, and the fire is spreading fast. The windows and doors are covered in flames—how will he be able to get out? (In the Japanese, he asks the Puzzle what to do, but it can't answer him. He thinks if the Puzzle is burned, he'll never see his other self again.)
Tristan, Téa, and Joey rush to the warehouse. They hear someone inside calling for help, and Téa runs to get help while Tristan and Joey try to get in. (In the Japanese, they see that the arrows end here, and wonder if Yugi's inside.) The door handle is too hot to touch, so they begin to kick the door to break it down. Meanwhile, Yugi is trying to put the Puzzle back together, thinking that even if he doesn't make it out, the spirit will be saved. (In the Japanese, he tells the spirit he's sorry he got them into this mess. He promises he'll put the Puzzle together so that they can meet, and he can apologize to his other self.) Joey and Tristan run their shoulders into the door, but it holds. Yugi fits a few more pieces of the Puzzle into place, as burning timbers fall around him. (One big difference between the two versions is the music, which really changes the mood of the story. In the US version, we've got loud danger music going on to get the blood pumping, while in the Japanese the scene is rendered quiet and and poignant by slow, sad music.)
Finally, Joey and Tristan break in, only to have Keith rush past them! "Did we just save Bandit Keith?" Joey asks. They search for anyone else trapped inside, and spot Yugi putting the last piece of the Puzzle into place. They rush to him, just as he begins to collapse from the heat. They try to pull him away, but he clings to the Puzzle, refusing to leave without it. Tristan goes to grab Yugi's deck from the dueling station, while Joey tries to get the Puzzle free. Téa, back from calling the fire department, shouts to the boys inside. Joey's having no luck with the Puzzle. Why did Yugi have to put it on such a thick chain? Tristan takes his turn pulling on the chain, but it won't budge, and neither will Yugi. They'll just have to think of some way to get it free! Joey and Tristan grab lengths of pipe and try to break the chain, but it's too strong. Then Joey gets the idea of putting the pipe through the hole of the eye bolt and using it as a lever to pull the bolt out of the wall. (In the Japanese, it isn't Jounouchi's idea. There's a scene that's cut from the US version where Jounouchi, trying again to pull the Puzzle free, feels it activate in his hands. Yami Yugi appears and tells him to pull out the bolt with the pipe. Jounouchi''s pretty startled, but quickly gets the idea.)
Both boys pull their hardest, and finally the bolt pops out.
The fire department has arrived and is pouring water on the fire. Téa implores them to hurry—her friends are in there!
At last, Joey and Tristan, carrying Yugi in his arms, run out of the burning building. They're safe!
In the hospital, Yugi is sitting in his hospital bed, wearing adorable sky-blue pajamas with little stars on them, with his friends around him. He's safe, and so is the Millennium Puzzle. Gratefully, he thanks them. You're the greatest friends a guy ever had! (In the Japanese, he talks about putting the Puzzle together. It took him eight years the first time, he says, but this time he did it in only a few minutes. His other self was helping him, he believes.) That's what buddies are for, Joey says. Lucky I spotted him, Tristan says, and Joey asks, what about my brillaint idea to pry the Puzzle off the wall? (In the Japanese, Jounouchi says he knows what Yugi means—he thinks he heard the voice of the other Yugi, too. And Honda responds that he knew Jounouchi couldn't come up with an idea like that on his own.) Tristan makes fun of Joey's "brilliance" and pretty soon the two are at each other's throats, until Yugi threatens not to share his hospital food if they don't knock it off. (In the Japanese, he tells them not to fight in a hospital.) Sheepishly, they settle down. The important thing is that they're all safe and together, Yugi says. (In the Japanese, Yugi thanks them for saving his life, and they tell him it's nothing.)
But Téa's a little preoccupied. She goes out into the hall, reflecting that someone's after Yugi's Millennium Puzzle, and because of that, she almost lost him! And she knows they haven't seen the last of whoever's after Yugi. They're in more danger than ever! (In the Japanese, she's reflecting on the nature of the other Yugi, thinking that at first she thought the other Yugi was inside Yugi, but now she believes he's there because of the Millennium Puzzle. But is he the one hiding inside the MiIllennium Puzzle?)
